Klurejr
Wizard
I finally made some time to Install my new Oxford Heated Grips on my 2003 Gen 1 FZ1 last night. I decided to take some pictures during the process in order to write up this quick "how to" thread. The glue is currently in the "24 hours" of recommended cure time, so I have not actually tested the grips yet to make sure they heat up, but I do not anticipate any issues. I apologize, I think a few pictures came out slightly blurry I was doing everything myself so I had to hold items and take a pic with the camera in the other hand.
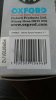
First - I always recommend opening the package and making sure all the contents are there and nothing looks broken. I had purchased an open box item from revzilla since it was a bit cheaper and I was happy to find nothing missing. (side note, Revzilla had very fast shipping, even when I selected the basic ground option)
On my bike there are end caps to protect the handlebars and grips, so first order of business was to remove them. The larger allan opening (there is a second smaller one inside that I think is 4.5mm) is 8mm, so I used my Allan Socket (one of the best tools I have ever purchased) to get them off. Once off, the existing grips were glued down, mine looked to be after market, but I have no idea how long they were on there, so I used a razor to cut them off. A quick slice down the middle and the old glue came free allowing easy removal of the Grips.


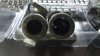
At this point you can see all the old glue is really gunking up the handlebar and would make it difficult to install new grips over it, so I used some 60 grit sandpaper to remove the bigger chunks, then I used some 200 to smooth it out, finally I cleaned the dust off using some Mineral Spirits.


Next up was the test fit, because of the shape of the Grips you need to make sure the part with the exiting cable leads back towards the rider and does not interfere with the Clutch pull on the left, or the Brake Pull on the right. IMO I think they might have fit better if I put them on the opposite sides so the cables came off facing downward and the "bump" was set facing the rider, however they were labeled Left and Right and I decided to stick with convention. The left side slid on pretty easy, so I knew a little more glue would be required. The throttle sleeve on the right had a tighter fit, so I was only going to need a small amount of glue once most of the grip was on. I actually had to use a rubber mallet to tap in the last 1.5 inches into place. The left side I actually slid it on, moved it around some to help spread the glue and then pulled it part way off to add more before setting it in the final spot.


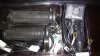
Next up I needed to identify my mounting point for the controller. There are a few options, a sticky pad you can use to glue the controller down(if you have a flat surface somewhere this would work) or a small mounting bracket. I chose the bracket as it can be direct connected via the mounting screw for the Clutch lever. Pictured is the original screw, which is black in color and the 4 provided screws that come in 2 sizes and the washer to put between the bike and the bracket to make space to go around the handlebar. I used the middle one as I did not need the extra length on the longest size. Like everything I test fitted it first. Then using the 4 small screws provided I mounted the Controller to the bracket and mounted the entire thing.


First - I always recommend opening the package and making sure all the contents are there and nothing looks broken. I had purchased an open box item from revzilla since it was a bit cheaper and I was happy to find nothing missing. (side note, Revzilla had very fast shipping, even when I selected the basic ground option)
On my bike there are end caps to protect the handlebars and grips, so first order of business was to remove them. The larger allan opening (there is a second smaller one inside that I think is 4.5mm) is 8mm, so I used my Allan Socket (one of the best tools I have ever purchased) to get them off. Once off, the existing grips were glued down, mine looked to be after market, but I have no idea how long they were on there, so I used a razor to cut them off. A quick slice down the middle and the old glue came free allowing easy removal of the Grips.
At this point you can see all the old glue is really gunking up the handlebar and would make it difficult to install new grips over it, so I used some 60 grit sandpaper to remove the bigger chunks, then I used some 200 to smooth it out, finally I cleaned the dust off using some Mineral Spirits.
Next up was the test fit, because of the shape of the Grips you need to make sure the part with the exiting cable leads back towards the rider and does not interfere with the Clutch pull on the left, or the Brake Pull on the right. IMO I think they might have fit better if I put them on the opposite sides so the cables came off facing downward and the "bump" was set facing the rider, however they were labeled Left and Right and I decided to stick with convention. The left side slid on pretty easy, so I knew a little more glue would be required. The throttle sleeve on the right had a tighter fit, so I was only going to need a small amount of glue once most of the grip was on. I actually had to use a rubber mallet to tap in the last 1.5 inches into place. The left side I actually slid it on, moved it around some to help spread the glue and then pulled it part way off to add more before setting it in the final spot.
Next up I needed to identify my mounting point for the controller. There are a few options, a sticky pad you can use to glue the controller down(if you have a flat surface somewhere this would work) or a small mounting bracket. I chose the bracket as it can be direct connected via the mounting screw for the Clutch lever. Pictured is the original screw, which is black in color and the 4 provided screws that come in 2 sizes and the washer to put between the bike and the bracket to make space to go around the handlebar. I used the middle one as I did not need the extra length on the longest size. Like everything I test fitted it first. Then using the 4 small screws provided I mounted the Controller to the bracket and mounted the entire thing.