Fuel Pump Keeps Priming

Hello Gents,
I did attempt to search this topic for those who get upset at repeating themselves for newbies, but.... Just couldn't find anything on this so... Here goes

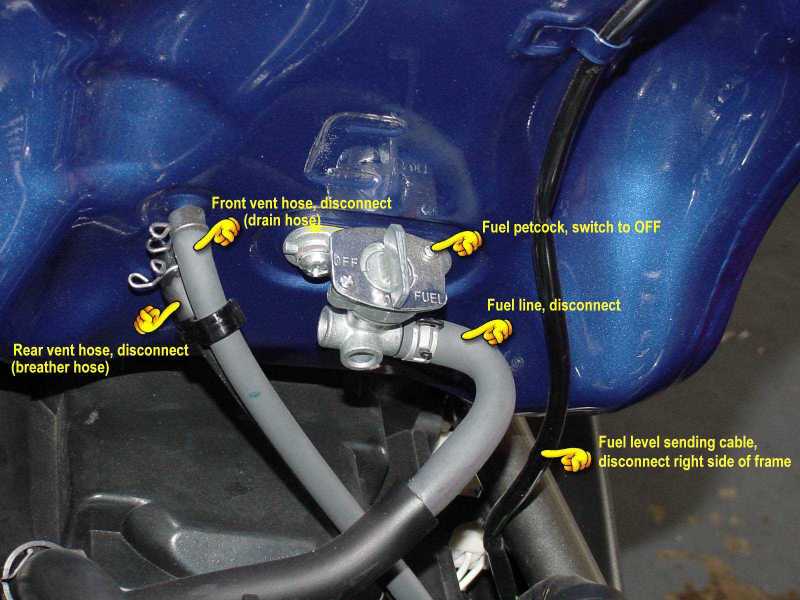
Finally got the tank off this bike for some issues, really just all cosmetic, nothing mechanical, although I will be giving it a carb sync soon. Damnedest thing is happening now, the fuel pump is not continuing to cycle but everytime you turn it on, it's not slowing down once the system has brought the pressure up which would lead me to believe that something is eryie. I guess to say it quick and dirty, the pump doesn't seem to be pressurizing the fuel system proberly. Because there's limited fuel, as soon as you try and move the throttle even ever so slightly, machine dies?

Am I missing something here?
Am I supposed to prime some VAC lines or something, and holy crap is there ever a whole lot of emissions junk on this machine, there are vac lines and tubes everywhere, :WTF: Do these things run better if you yank all that forshizel outta there?

I filled the gas tank up to half as it was near empty. OK yeah, maybe it needs more fuel, nothing though, have I got to fill it all the way up?

K, maybe I've gotta leave the gas tank open and then try and prime it, but I've only got one key and the key won't come out unless you close the bloody cap, again, :WTF: Well yeah, I know easy fix, buy another key, but what the heck, is there a way to take the key out of the cap when it's not "in" the tank?

I've also thrown a big arse carbon fibre can from an R1 that sounds waaaay too sweet on the bike and may need to do some jet fiddling. Can anyone tell me what the stock jet(main&pilot) sizes are and also some rough idea as to where most carb settings are? Just an idea, I know, I know, temperature, altitude, all that jazz, just need an idea?

Feel free to let me know of any issues or things I can do to make the machine run better, return better fuel mileage, get better power, any of those sorts of things.

Thanks much,

Michael
 
The first thing I would check, and I'm sure everyone else is going to say the same thing, is to go back and make sure that EVERYTHING you disconnected or pulled on while taking the tank off is back together properly. If the pump won't shut off the thing isn't coming up to the pressure it's supposed to hit. By the way, do you have fuel leaking anywhere? That would be a sign that something is loose. I have a Gen II so I'm not familiar with the plumbing on the Gen I bikes but it's got to be something you pulled off or loosened without knowing it. Look hard, you'll find it.
 
I'll bet you're right about the old "on/off switch. Since the last four bikes I've owned were F/I I forgot about the ability to switch from on/res/off. Good thinking.
 
as far as jetting... here we go.

Stock jets are 132.5's (outside carbs) and 130's (inside carbs)

Pull the carbs off. drill out the brass plugs covering the mixture screws. set mix screws at 3.5 turns out from seated.

Now, pull the bowls. change the main jets as follows : if you're at sea level to 2000ft, go with 127.5 mains all of the way across. 2000-4000ft, 125 mains. 4000-6000ft, 122.5's.

Set the float height to 14.5mm. Factory setting is 12-12.5mm... this puts too much fuel in the bowls.

Button the bottom end back up and roll the carbs over.

Pull the caps off the top of the carbs and remove the slides.

Take the needles out, and add 1mm worth of shims under each needle. The shims can be found at most Radio Shack stores, and look like small washers with a height of about .5mm.

While the needles are out, take a #32 drill bit (which is a pain to find... if you can't find a #32 which is .1160 inches, get a 7/64 bit which is .1060".. that'll work just fine.) On either side of the needle hole in the slides is another smaller hole. Drill out those 2 holes on each slide and blow away all of the plastic shavings with compressed air.

Re-install the needles and then the slides into the carbs. Then button up the top of the carbs again.

Jetting is done.

For added fun, while you have the tank off, take the rubber cover off of the top of the airbox... go ahead and cut off the rubber grommets that the side covers attach to, and leave them on the metal posts.... throw the rest of the rubber cover in the trash. Remove the airbox lid. Cut a 1" hole in the top of the lid, directly above the "snorkle"... after you cut the hole in the top, flip the cover over, and cut off the front of the snorkle (the side facing the carbs).. this'll let it breathe a lot better.....

Air-box mod done. Put the cover back on.


Well, if you've made it this far, and are still sober enough to keep going, while you have the tank off, and the carbs out, take off the intake boots that mount the carbs to the engine... bring out the Dremel.... with one intake boot still on the engine, reach inside of it towards the engine... you'll feel a lip on the intake boot that chokes down the size of the intake going into the engine... meaning, the end of the intake boot is actually smaller than the intake port on the engine... not a wise decision on yamaha's part...

You're going to use the sanding drum on the dremel to get rid of this extra rubber on the intake boot... it'll take a little while on the first one, a bit of sanding, then test fit, feel for the lip... if the lip is still smaller than the intake, keep going... once you get it matched up, you'll know how much you have to take out of the other boots... also, looking through the boot from front to back, you'll see a hump in the bottom of the boot that makes the air and fuel mixture have to travel up and over that hump to make it to the combustion chamber... go ahead and get rid of that hump.... you want a nice smooth run for the air and fuel all of the way from the airbox to the combustion chamber.... once again... it might take a minute, but you'll get the hang of it, and you'll figure out how much you need to take out...

when the intake boots are all done with the rough sanding, you can either finish them off with some 300-600 grit sandpaper to smooth things out, or I like to use a polishing stone from the dremel kit... the green one that's shaped like a cone... it does a good job of smoothing everything back out....

Then, blow the boots out with some air, and re-install. reinstall carbs, let the tank flow some fuel into them, and go ahead and do a carb sync while you're there...

This will really liven the bike up... next step would be to advance the timing... this can be done with the stock components, but you have to be extremely precise... most of the time, it's just easier to call up Marc at Factory Pro and buy a timing advance.


There ya go. That's how I liven up Gen 1's all of the time.. it's a tried and true method... and works like a charm... all in all, in parts you might have $30...
 
the petcock

from the sound of it... it sounds like you left the petcock in the off position on the bottom of the tank.
Well in the searches, using several different titles trying to access fuel petcock location, I have turned up nothing usefull. Now 'VA' you mentioned it, and I thought, 'what do I need glasses' ? But for the life of me I don't see it under there? DOH.....(Homer moment) Can you dirrect me to it or the location, I thought mabe it might be under the seat at the lowest point in the tank, but I havn't pulled off the seat yet. I probably at some point this morning as I'm detailing this 05 FZ1 to the showroom condition it appears to be able to garner. This unit did not come with a motor manual that I see, looked under the seat and all, but 'nada. On another note, I'v had this bike going on day two now, wow what a machine, I can only imagine the service I
ll get out of it with maintenance and soft riding....oh of course I'll womp it from time to time, but what a smooth idealic bike. (my last being a Buell)

Here you go:

tankhoses1.jpg


And you may want to have a look around Pat's page. It's great for the Gen I bikes. He covers just about everything you can think of.
 
This diagram is all I could find. I highlighted the valve. It is a breakaway but appears to be facing front at the rear center of the tank.
1637d1263820699-fuel-pump-keeps-priming-diagram.jpg

NJFZ1 Beat me to it...

I do not have a GenI so I hope this is right!
 
Last edited:
yes... in order to get to the petcock, you remove the seat, and take the bolt out of the front of that tank.... then lift the tank toward the rear of the bike... the petcock is at the lowest point in the tank, dead center.

it basically exists just so you can shut off the gas when removing the tank... otherwise, it acts like a vacuum operated petcock that automatically closes when there isn't vacuum being pulled... this is why they hide it under the tank, as there's no reason for you to need to use it under normal circumstances.
 
Back
Top