- Thread starter
- #341
Hellgate
Wizard
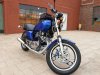
Today the XV took her first long ride. I put in 80 miles and she ran flawlessly.
In notes to myself; I back the shock damping off three clicks. The fork, while much better than stock, is not compliant. I'm going to try oil that is 5wt. IIRC I used 10 wt. I need to check my notes. If it is 15 wt I'll try 10 wt. If that doesn't work I need to contact Race Tech to get guidance on emulator springs and settings. With about 55 lbs removed from the bike the suspension is over dampened, possibly over sprung. I need to replace fork seals while I'm in there. The left leg is totally blown and pumping oil out onto the motor. Ick...
In notes to myself; I back the shock damping off three clicks. The fork, while much better than stock, is not compliant. I'm going to try oil that is 5wt. IIRC I used 10 wt. I need to check my notes. If it is 15 wt I'll try 10 wt. If that doesn't work I need to contact Race Tech to get guidance on emulator springs and settings. With about 55 lbs removed from the bike the suspension is over dampened, possibly over sprung. I need to replace fork seals while I'm in there. The left leg is totally blown and pumping oil out onto the motor. Ick...


")