What's The Consensus On Rotor Stator Replacement?

What are you referring to, can you provide a link?
On the topic - I bought an RM rotor after reading about it but havent fitted it. Original still works and ill have to deburr the RM before fitting which makes me doubt the quality control (is it well balanced) and whether I really should swap (dont fix what aint broken)
Just go to the rm website or Amazon and read the Reviews. That's were I got that info.
 
Or...you could just buy a replacement gasket, which was AU$2 here, and see if you actually need to outlay any money. A previous owner may have already competed this upgrade.
If, once you open it up, it still needs the upgrade, you put your bike back together and plan for the expense.
Just a thought....
 
New guy jumping in here as it seems like the right place to ask. I (UGH!) recently laid my '07 down, resulting in the need to replace the crank case (stator/generator) cover and plug. Upon finding that this wasn't just a quick cover change, I waded into the internet world on just what I was getting into. I've come away with an action plan to definitely inspect the rotor and stator, but I'm also left with needing some answers. Any feedback would be awesome. 1) It appears as though the stator mounts to some sort of adaptor/bracket that has an interference fit with the crank case cover - Is this true? b) How do I remove the stator mount/adaptor from the old crank case cover and install into the new? 3)Since I was lucky enough (I think) to keep from dropping the washer and spacers into the gaping maw of the lower crank case during my accidental removal of the rotor and associated gear-set, is there a good way to re-assemble without sweating the "clink" sound that let's me know I just screwed up?
 
New guy jumping in here as it seems like the right place to ask. I (UGH!) recently laid my '07 down, resulting in the need to replace the crank case (stator/generator) cover and plug. Upon finding that this wasn't just a quick cover change, I waded into the internet world on just what I was getting into. I've come away with an action plan to definitely inspect the rotor and stator, but I'm also left with needing some answers. Any feedback would be awesome. 1) It appears as though the stator mounts to some sort of adaptor/bracket that has an interference fit with the crank case cover - Is this true? b) How do I remove the stator mount/adaptor from the old crank case cover and install into the new? 3)Since I was lucky enough (I think) to keep from dropping the washer and spacers into the gaping maw of the lower crank case during my accidental removal of the rotor and associated gear-set, is there a good way to re-assemble without sweating the "clink" sound that let's me know I just screwed up?


Welcome! Wish it was under better circumstances but happy to have you here, nonetheless!

I watched these two vids -
-

Ended up doing my own thing since everything came out together for me. A stroke of luck as I've found that I usually end up close to the worst case scenario... lol. Putting everything back in, I just kept twisting/wiggling/cursing until I finally found the sweet spot. It's tough because it's dark and shining a light doesn't really help.

Good luck!
 
OK... After a comedy of errors and points where I could stop myself (and didn't), I somehow reversed the inner sleeve (tapered end to the bearing) and toasted both bearings.

The inner bearing is replaced, but I'm having fits trying to figure out how to get the bearing housing (at the stator end) out so I can replace that bearing.
Parts view of the bearing housing.jpg
The problem child is Housing #4. I'm trying to get Bearing #2 replaced. It doesn't want to turn at all. The three screws are out, but the housing is also pressed into the crankcase cover.

What is the trick to getting the housing and bearing out without doing more damage?

outer bearing in case2.jpg
 
OK... After a comedy of errors and points where I could stop myself (and didn't), I somehow reversed the inner sleeve (tapered end to the bearing) and toasted both bearings.

The inner bearing is replaced, but I'm having fits trying to figure out how to get the bearing housing (at the stator end) out so I can replace that bearing.
View attachment 27616
The problem child is Housing #4. I'm trying to get Bearing #2 replaced. It doesn't want to turn at all. The three screws are out, but the housing is also pressed into the crankcase cover.

What is the trick to getting the housing and bearing out without doing more damage?

View attachment 27617

Whooo, boy... You really pulled a "me" on that!

Find a socket that fits snug on the side that you will be moving away from and another socket (or appropriate item) that will allow the bearing to slide through on the other side. Place in a bench vise or similar pressing tool and start pressing, making sure it is coming out evenly. A second set of hands to get everything stable is highly recommended...
 
I have a slide hammer that will fit the inner bearing race, but the outer race is bigger than the hole in the housing. The bearing apparently presses into the inner side of the housing.

I also don't have a bench vice, but with a slide hammer i may be able to pull the bearing and housing in one pull, then pull the bearing from the housing....
 
Last edited:
Put the cover in the oven at 200 for about 15 minutes.
With a little persuasion, the slide hammer got it out.

Socket and mallet got the bearing, using my redneck bearing holder... 2x4 with a hole and a socket.

New bearing is in the freezer.

Thanks!!!!
 

Attachments

  • 20221022_144938.jpg
    20221022_144938.jpg
    1.9 MB · Views: 8
Put the cover in the oven at 200 for about 15 minutes.
With a little persuasion, the slide hammer got it out.

Socket and mallet got the bearing, using my redneck bearing holder... 2x4 with a hole and a socket.

New bearing is in the freezer.

Thanks!!!!

Glad that worked for you!
 
Now... If I can just get the bearing housing back in...

I got the new bearing seated in the housing. The "collar" (Item 5) sits on the bearing face on the inside of the bearing, and would be pressed in the space between the bearing and the engine case. If you turn it so that the housing is up and you can see it, the collar falls out and moves around in the open space between the housing and bearing, so it has to be pressed with the engine case facing upward. OK... I don't have a press. It seemed to go in a little, but then went a bit crooked. It's tight as heck now. Oh... and when pressed, the three screw holes have to line up. The screws are pretty short, so starting the screws first doesn't seem to be an option. It doesn't help having the big notch cut out of the housing so that you don't have a good place to press evenly on all sides.

I'll try the oven trick again and see if I can get it straightened up. I don't want to use the slide hammer again to get the housing back out... Don't want to damage the bearing. If it has to come out, I'll have to order another new bearing, and it may mean it's time to go buy a shop press. Searching for shops in the area, and nobody is open when I can break loose from work... All of this because I put a spacer in backwards... still kicking myself.
 
Now... If I can just get the bearing housing back in...

...it may mean it's time to go buy a shop press.

Yeah, probably should just "bite the bullet" and increase the odds of doing it right. I've got so many "one time use" tools, I've forgotten I had them and ordered them again...
 
Ordered another bearing, replacements for the housing screws and the stator screws. Found a shop press that will work, but I'm not going to be able to get it for a couple of weeks. Trying to get all this done around a rough work schedule. I figure I can use the longer stator screws as guides as I press the housing back in. It might be a challenge getting it set on the press with the screws in, but I should be able to figure it out. maybe I can find a huge socket to fit around the odd shaped side of the housing in the press.

I guess I've been thinking about a cheap shop press for awhile anyway. Don't need it often... but...
 
OK. Did a road trip Saturday a Harbor Freight in Madisonville, KY, in search of a hydraulic press. They are only $150 (with my 10% coupon), which beats the heck out of all the options. Got it assembled Saturday night, and started by pressing out the crooked housing out of the case. Since I had to press on the bearing, I replaced the first new bearing with another new one. It was probably fine, but I'm paranoid at this point. Pressed the new bearing in. I checked to see if the housing was aligned properly now, an the longer stator screws wouldn't go in... the alignment was slightly off, so it all had to come back apart anyway.

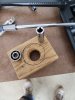
I pressed the housing partially back into the case, and it started straight. That was good, but the housing sits recessed into the case, so I went as far as I could go to get it nice and straight, and then set it on a scrap piece of wood that I previously cut out of a 2x4 with a hole saw. The two pins on the housing were in there tight, and rather than risk messing them up and waiting for parts again, I drilled holes in my wooden "donut hole" and that worked. Using the longer stator screws as guides worked great, but they stick up in the air and prevent pressing on the case. Another 2x4, holes drilled for the screws.

With my redneck donut and 2x4, the housing pressed in nicely, and that infernal collar on the inside of the bearing stayed in place. All good! reassembled the stator (all torqued per spec and red locktite).
Double checked everything again, re-installed the rotor, stator, and changed the oil again, just in case I had some metal shavings in there...

Test ride. No funky sounds anymore!!!! All appears to be working well, and I think it's ready for a ride! Whew... All of this because I didn't stop and re-verify that dang spacer orientation. But... I have a press, bearing puller and driver now. The test ride was great. I love this bike.

I have a lot of pictures and I need to put it all together in a write-up to show exactly how I did things, and maybe some things that I would not recommend. Detailed information on this job seems pretty much non-existent, so I'll try to get something good together for anybody that may need it in the future.
 
I had an 06 that went out on me, around 50,000 miles.
Went for a ride, stopped about an hour later, started it back up and then noticed it had a new sound, which sounded a bit like a super charger whine. Road for about a half hour, stopped again, bike wouldn't run. Put in a new battery, tried to limp it home. Worked until I had to pull in the clutch which dropped the RPMs a pinch and then it died.

After that battery, a tow, new stator, special tool to get it out, oil pan seal and oil (cleaning out the magnet pieces) it ran me about $1,000. That was about 6 years ago.
 
Mine was a 2012 with 48K miles. The old rotor looked fine, but you never know when the adhesive may let loose on just one magnet. Having the new one does give me the peace of mind, even though I found a way to make the replacement more difficult.
 
OEM upgrade cost me $530 here in Oz

yeah your not joking, i got mine for $440 from the Netherlands... yeah thats right it was $70 give or take cheaper getting it shipped all the way from the Netherlands then to get it from Japan where its made, which is closer. fuck the australia tax !

it was 4 or so years ago. i wish i knew about RMSTATOR they make a aftermarket one for $300 similar to the new yamaha one, only $200 cheaper !
 
Last edited:
Sounds like some had to modify the rm product slightly to fit properly ( sanding) ?
I know this is a year plus later but I had to hone the shaft so the collar with the two chamfer end. It’s the collar that basically goes on first inside the gears wouldn’t fit perfectly.

id say I honed about .0025 off for it to fit and spin freely. I’d say QA at rmstator is suss maybe. But once done it fit perfectly and no problems.

I used an rmstator rotor and fortunately it fit fine.
 
Back
Top