- Admin
- #1
FZ1inTX
Adminstrator
I recently had some issues getting my TB sync done and done correctly. After a long talk with Ivan about my woes, he provided me with a method to "start over" which paid off in dividends and for this, I am thankful. He's recommended I share this with you as it may help you all down the road.
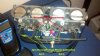
If you know about the sync and have the manual, it tells you some basics but not enough. First thing it mentions is a magical (and almost unattainable!) 225 mmHG for a vacuum reading. As many know, this is nearly impossible and you'll mess up the bike trying. Long ago, I sync'd and didn't shoot for 225, I just balanced them based on the #3 cylinder. I believe it was in the 265 range. The Morgan Carbtune Pro is based on cmHG so it was 26.5. Two more things... the manual says nothing about any recommended temperature NOR does it say anything at all about RPMs.
So this time, I made the mistake of trying for 22.5. All four screws were nearly backed all the way out and still, 24.5 was about as close as I could get. The bike ran like CRAP. I could not get the idle below 1600 with the idle screw backed all the way off! I tried twice more and gave up yesterday. I posted my woes and Ivan answered for me. After a long chat, about this and other things, I was set to start over this morning. 20 minutes under the tank was all it took. So I'd like to share this with you.
First, IGNORE the magical 22.5 mmHG recommended setting... forget it! What is important is to balance all four throttle bodies no matter the number.
I'm adding this also after I wrote these instructions. These were written when I messed up all four settings. If you have never touched screws #2 & #3, do NOT seat any of the screws, skip steps 3 & 4 and move on.
Here's what Ivan told me to do and you will not find this in a service manual:
This advice, as I said, isn't written anywhere and worked perfectly. Without Ivan's guidance, I'd be still likely doing battle with this and frustrated beyond belief. I cannot tell you how easy this method was and since you don't really have to mess with the brass screws for #2 & #3, 1 and 4 are the easier two screws to reach and see.
I'm going to do Michele's FZ1 when I have some more time and I'll update this with instructional photos and highlights/arrows in them. I really hope this helps out some of you the way Ivan helped me out because this can be seriously frustrating. I do not understand why the manual doesn't have these instructions. I'd have NEVER touched #2 or #3 at all and been done Saturday.
So why was my bike idling so high with no adjustment left? Ivan had two reasons, one was I had pinched something in that area and the idle screw couldn't seat to metal OR, I had too much air in the system. Nothing was in the way of the pulley or idle screw... so it was too much air. Because I'd had those screws backed out so far, it was a constant vacuum leak and the brass screws were doing nothing, just bleeding in a TON of air. This is why the bike was crazy with idle. All my own fault but I'm putting some blame on the service manual for not providing clear instructions.
She's spot-on now and I have idle adjustment room. I hope this helps someone out because I was not having fun at all. After idle, the bike ran like Usain Bolt seeking a Gold... faster than it ever had. Stunning on the road, shite at any one stop. No more!
If you know about the sync and have the manual, it tells you some basics but not enough. First thing it mentions is a magical (and almost unattainable!) 225 mmHG for a vacuum reading. As many know, this is nearly impossible and you'll mess up the bike trying. Long ago, I sync'd and didn't shoot for 225, I just balanced them based on the #3 cylinder. I believe it was in the 265 range. The Morgan Carbtune Pro is based on cmHG so it was 26.5. Two more things... the manual says nothing about any recommended temperature NOR does it say anything at all about RPMs.
So this time, I made the mistake of trying for 22.5. All four screws were nearly backed all the way out and still, 24.5 was about as close as I could get. The bike ran like CRAP. I could not get the idle below 1600 with the idle screw backed all the way off! I tried twice more and gave up yesterday. I posted my woes and Ivan answered for me. After a long chat, about this and other things, I was set to start over this morning. 20 minutes under the tank was all it took. So I'd like to share this with you.
First, IGNORE the magical 22.5 mmHG recommended setting... forget it! What is important is to balance all four throttle bodies no matter the number.
I'm adding this also after I wrote these instructions. These were written when I messed up all four settings. If you have never touched screws #2 & #3, do NOT seat any of the screws, skip steps 3 & 4 and move on.
Here's what Ivan told me to do and you will not find this in a service manual:
- Set your idle for 1250 - 1350 RPMs.
- Hook up your vacuum gauge device after lifting the tank and propping up (I use a piece of scrap wood cut to fit between the top triple/handlebars and the lip of the tank)
- Turn all four brass set-screws IN to full lock for cylinders 1 through 4
- Back out all four screws exactly 2 full turns.
- Balance #2 & #3 by using the screw in the middle of those two throttle bodies as you look straight down. Correct, *not* the brass screws! This is the spring throttle linkage you will be turning. Go small increments as it rapidly changes.
- Turn this spring-loaded screw gently in each direction until you achieve a balance on the gauge.
- Once #2 & #3 are balanced, use the brass screws for #1 then #4 to balance them with #2 & 3.
- Between each adjustment, give the throttle a slow nudge and slowly back off. Don't BLIP and let go.
- Once balanced, bring it to about 4k RPM then slowly back to idle and check the sync.
- If all is well, set the idle for 1250 - 1350 RPMs and put the bike back together.
This advice, as I said, isn't written anywhere and worked perfectly. Without Ivan's guidance, I'd be still likely doing battle with this and frustrated beyond belief. I cannot tell you how easy this method was and since you don't really have to mess with the brass screws for #2 & #3, 1 and 4 are the easier two screws to reach and see.
I'm going to do Michele's FZ1 when I have some more time and I'll update this with instructional photos and highlights/arrows in them. I really hope this helps out some of you the way Ivan helped me out because this can be seriously frustrating. I do not understand why the manual doesn't have these instructions. I'd have NEVER touched #2 or #3 at all and been done Saturday.
So why was my bike idling so high with no adjustment left? Ivan had two reasons, one was I had pinched something in that area and the idle screw couldn't seat to metal OR, I had too much air in the system. Nothing was in the way of the pulley or idle screw... so it was too much air. Because I'd had those screws backed out so far, it was a constant vacuum leak and the brass screws were doing nothing, just bleeding in a TON of air. This is why the bike was crazy with idle. All my own fault but I'm putting some blame on the service manual for not providing clear instructions.
She's spot-on now and I have idle adjustment room. I hope this helps someone out because I was not having fun at all. After idle, the bike ran like Usain Bolt seeking a Gold... faster than it ever had. Stunning on the road, shite at any one stop. No more!
Last edited:

")